
This article is prompted by a combination of a casual enquiry about sending photos from your iPhone to Google Photos (hosted on a Google Drive), and my own discovery that I was backing-up iPhone photos to BOTH iCloud and Google Photos.
Observation one. Google Photos and iCloud Photos don’t work in quite the same way. Whereas you can access the Photos you may have stored on Apple’s iCloud storage from icloud.com through the iCloud Photos app, you cannot access Google Photos from drive.google.com directly – you have to go to photos.google.com to access them. Google Photos uses up some of your Google Drive storage – you get 15Gb “for free” with a Google account – but it’s a standalone application, in the same way as Google Mail is. It’s an important distinction. Google provides you with applications which make use of their cloud storage, Apple provides cloud storage alongside access to applications which use that storage and which synchronises back to devices.


Observation Two. This article concentrates principally on Google and Apple, because they are the two principal players in the Camera and Cloud Storage space. There are other cloud storage solutions on which you can store photos, eg Microsoft’s OneDrive, and Dropbox. I will only refer to these briefly at the end of this article. There are undoubtedly other cloud storage solutions, but I won’t be writing about them.
Observation Three. Anything I write about the link between Camera and Photos on an Android/Google system is second-hand knowledge, and I cannot verify it!
Observation Four – the final one. This article does not seek to cover the general topic of transferring photos from a phone to your computer. This is more than adequately covered in this article. I suggest you read it too.
Not wishing to be dismissive, but just because it’s so straightforward – I’m going to discuss Google Photos first. If you have an Android phone and thereby have a Google account, you automatically have 15Gb of cloud storage and the two are linked, and by default any photos you take on your phone are backed-up to your Google account. This is described well in the Google Support article. A couple of things are worth highlighting however: a) you can switch-off automatic back-up and synchronisation of your photos, in which case all backups would need to be done manually; b) you should carefully choose the “quality” of the photos you back-up – they may not be the same as that of the photo on your device; and c) it would appear that you could backup photos to a different account from your main one, thus adding to the free 15Gb you get with each account. [Alternatively, for £15.99 a year you could get an additional 100Gb of storage from Google. If you aren’t an Apple user this is definitely worth considering.]
It’s not that much more difficult if you want to save photos from your iOS (iPhone or iPad) device to the Google cloud storage. Again the Google Support article describes the process and the options quite well.
Similarly if you’ve transferred photos to your computer (eg from a camera SD-card), then Google’s got you covered to back-up and sync to their Cloud storage in this article. You should nominate a folder on your computer that Google Drive will monitor for newly added files which will then be backed-up and synced to either Google Drive, or to Google Photos, or both, depending upon the option(s) you’ve chosen.
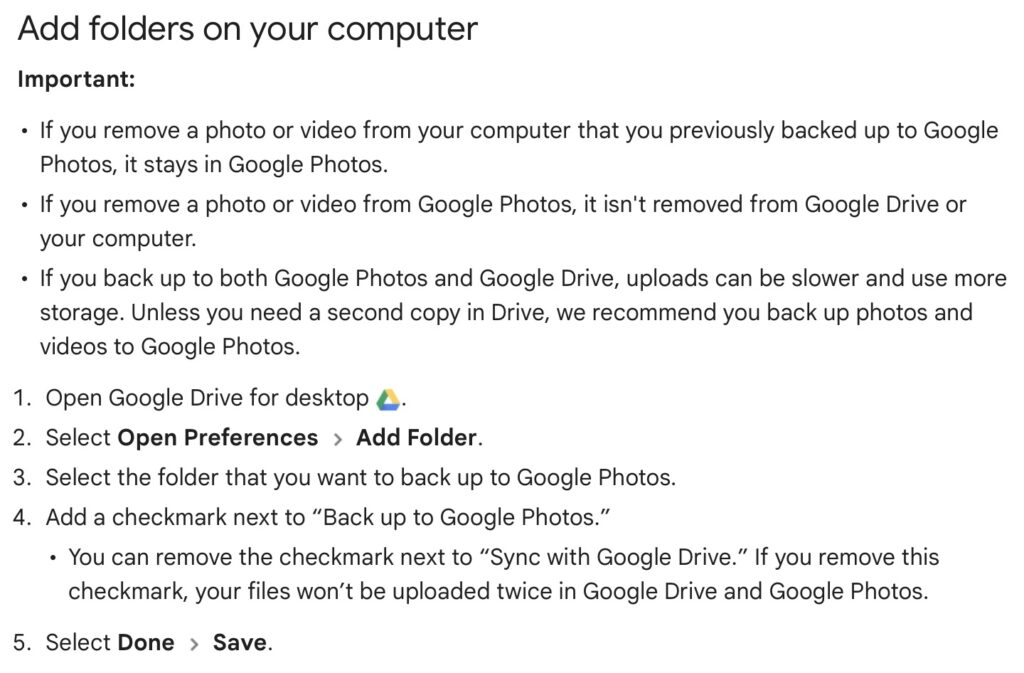
For this to work however, you do need to be sure you’ve a) installed the Google Drive on your computer, and b) you’ve set the preferences the way you want them. In my case, since I’ve increased the amount of Google storage I have, I’ve chosen to Mirror a folder (in itself called Google Drive) – then both the folder on the computer, and the one in the cloud should be exactly the same. A mirror in fact. Anything I add to (or edit on) my local Google Drive will be copied to my Google Drive in the cloud.

So we turn next to the Apple ecosystem. [I should feel more confident here, but as you may have noted that I disclosed at the start of this article that I was doing something extremely stupid and not noticing my idiocy.] Here the support page on Apple Photos and iCloud I think really does a good job of explaining your choices and how to set up backup to their cloud storage. I don’t think I can improve on it. But what if you’ve got Google Photos installed as well on your iOS device? This is where I made my foolish mistake. I enabled Backup and Sync on my iPhone and so I got TWO copies of every photo – one in my Google storage in Google Photos and the other in my iCloud storage. Duh!!!
Disabling the Backup and Sync left me with an image which was shared locally between the Google Photos and Apple Photos apps. How could I get that image (or group of images) onto Google Photos to perhaps share with friends or family?
It turns out that there are two reasonably easy ways of doing this. By enabling iCloud Photos on the phone (or tablet) …

… I can then download from iCloud to a folder on my computer which I can then upload to Google Photos from. Really rather simple and not a use case for Google Photos Backup and Sync to be employed.
Alternatively, I could go into the Google Photos app, select the image I want to send to Google Photos in the cloud and Share it by getting a link and then sending myself a message. The act of sharing it copies the image to the cloud, from which I can then add it albums, etc.
Using either of these approaches allows you then to obtain a link for the album which you can then Share to a list of users, or obtain a link for public sharing.
Once you get the photos onto Google Photos the fun starts. It’s not intuitive what happens when you decide you want to delete them either from the cloud, or from your device. In fact it’s downright confusing. I’ve written about this in another place (the public Thought grazing) and life is too short to repeat anything on here that I’ve already written over there, and believe still to be correct. Best of luck!!!
The situation with deleting photos from Apple Photos and iCloud Photos is slightly more straightforward and I’ve written this up already, so won’t repeat it.
It goes without saying that keeping it all in the Apple ecosystem (for me) makes a lot of sense, and with the ability to share albums on the way – it’s not yet as sophisticated as the Google Photo Albums service – I may transition away from Google Photos altogether in time.
If you’re a PC Windows user with an iPhone, then a solution is beginning to appear that enables you to use the Windows Photo application with iCloud. You can install iCloud for Windows on your PC and then you should be able to manage your iPhone photos from your desktop.
For Dropbox users, you can setup an automatic upload of photos to the service. They even give you a bit more free storage if you enable this, or at least they used to!