
Category: Software

  • Before you upgrade …

    Before you upgrade …

    It’s that time of the year again for Apple users; the new devices are being shown to the world and you might once again if you’re an Apple fanboy or fangirl be thinking about a new purchase, OR upgrading your software with the new operating systems each with the ’27’ suffix.

    We’ll leave the hardware devices aside, they can be expensive and with every year that passes I have to question whether I need a new shiny device. My iPhone 14 Pro is now at least 4 years old, my MacBook Pro older still, and I’m happy with the Mac Mini 4, and iPad Pro I bought over the last couple of years – so no hardware for me. However software upgrades always have to be considered.

    Some devices run out of steam and can’t take the latest software. That’s inevitable and you can’t really complain about that. Technology moves on and to get the new features of an operating system you might eventually have to upgrade your hardware. That’s technological life! With advances in technology security issues pop up to the surface and the unintended consequences of some code become apparent. That forces the need for software updates and upgrades. These should not be dismissed as not relevant to you. They might be, and you will never know that until you fall foul of an insidious bit of malware. This has become more apparent with the advent of AI, because technology companies are now using the tools that this new technology provides to find the bugs and glitches in their own software, so ignore security updates at your peril!

    So why is this post targeted at Apple users? Or, more specifically Mac users, those running the MacOS operating system. It’s because support for old Intel processors in these systems is coming to an end.

    Back in 2020 Apple started manufacturing their own silicon; their own processors on a chip. They created new architectures for their computers and these are described as the “M series”. The Macs have gradually moved from the former Intel processors, to the M series and now, no Mac is being made with an Intel processor. They’re all M series machines – M1 -> M6.

    To achieve a smooth transition to the new architecture Apple had to provide a software emulation of the Intel chipset to enable software written for the Intel platform to run on the new Apple processors. This emulator was called Rosetta. However Rosetta is just as vulnerable as any other piece of software to malware, so Apple gave early notice that support for Rosetta would not be long-term; at some stage it declared that with the launch of MacOS 28, in autumn 2028, Rosetta would not be supported and would not run on the M series machines running MacOS 28. So a lot of old Intel based software would become end of life, and this is really what this post is all about.

    Apple is not springing this upon its users, it warned us it was coming and we should now take stock and prepare for the change.

    Since a date earlier this year – if you were running MacOS 26 (Tahoe) – if you ran a piece of software that relied on Rosetta you’d have received a warning that the application would not run on MacOS 28. OK that’s two years away … I can ignore that for the moment. However, from this month, if you were to install MacOS 27 (Golden Gate), that software will not run because you need to install Rosetta manually – it’s not pre-installed as part of the operating system as it has been since 2020. So installing Rosetta may be something you have to do.

    This is how you do that. [Click the link]

    I was going to describe how you did the install, how you identified the apps that would cease working with MacOS 28, but it’s all well-explained in the article above. If you’re a Mac user, please read it.

    So what should you consider doing now?

    Well, I used the information in the article to review and identify all the applications that I had installed on my Mac to see if they were described as Intel (Universal and Arm64 being OK). [I think you can ignore any that say 32-bit because they won’t work anyway, they’re left-overs and I’m not sure how to clean your system of these – I will research that though.]

    I then looked to see if I was using the application, if not, I uninstalled it – it’s amazing the dross that you leave in your Applications Folder and how liberating it feels to say goodbye.

    If there was an application that I thought I’d need going forward, I looked to see if I’d missed an upgrade to it that would provide Apple Silicon compatibility, and then upgraded it.

    Some upgrades might involve a cost, so I looked to see if there was an alternative that I could use to provide the same functionality. I did this as well for applications where no upgrade path was provided – for applications that had stopped being supported some time before.

    But for some applications, in my case Epson printer drivers and applications, the situation was not clear. I put these applications on watch. I now knew which applications I would have to resolve before I upgraded next year to MacOS 28.

    That might seem a long time away but for something like printer support this is vital and I don’t want an expensive piece of hardware to suddenly not work unexpectedly.

    Here’s another way of identifying the apps that might give you problems.

    Click on the Apple icon (top-left hand side of the screen) and then More info … to get the System Settings screen:
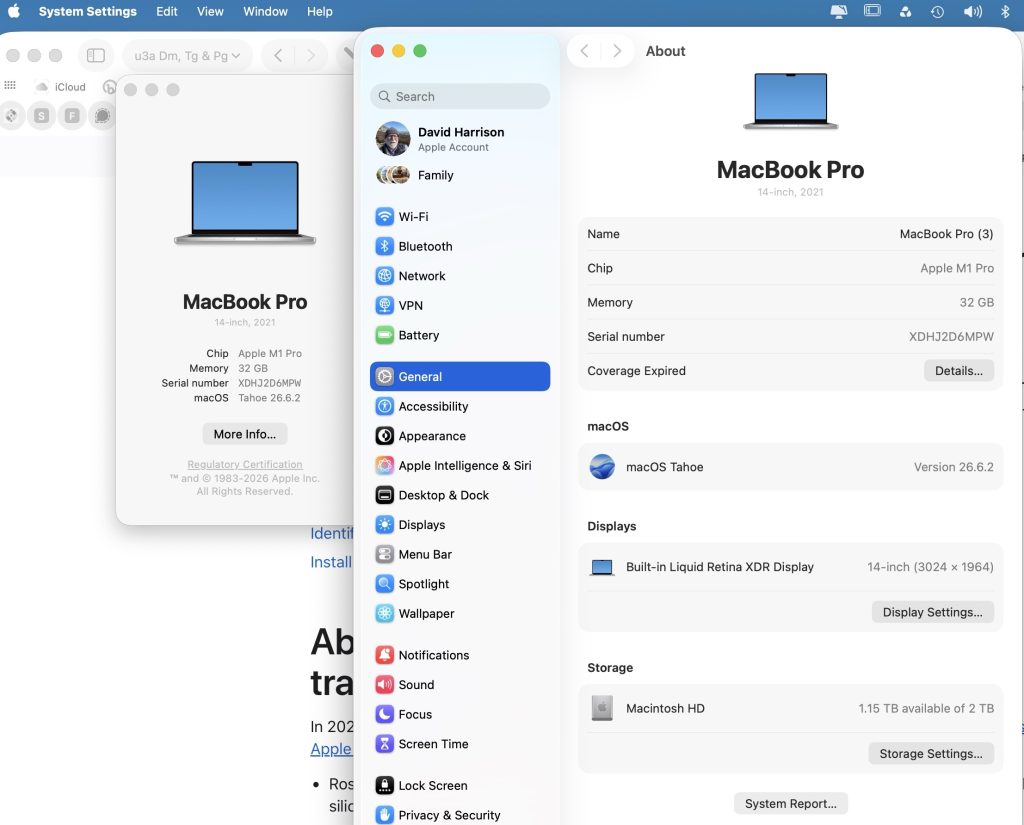
    Systems Settings screen

    Choose System Report and then scroll down to Software > Applications:
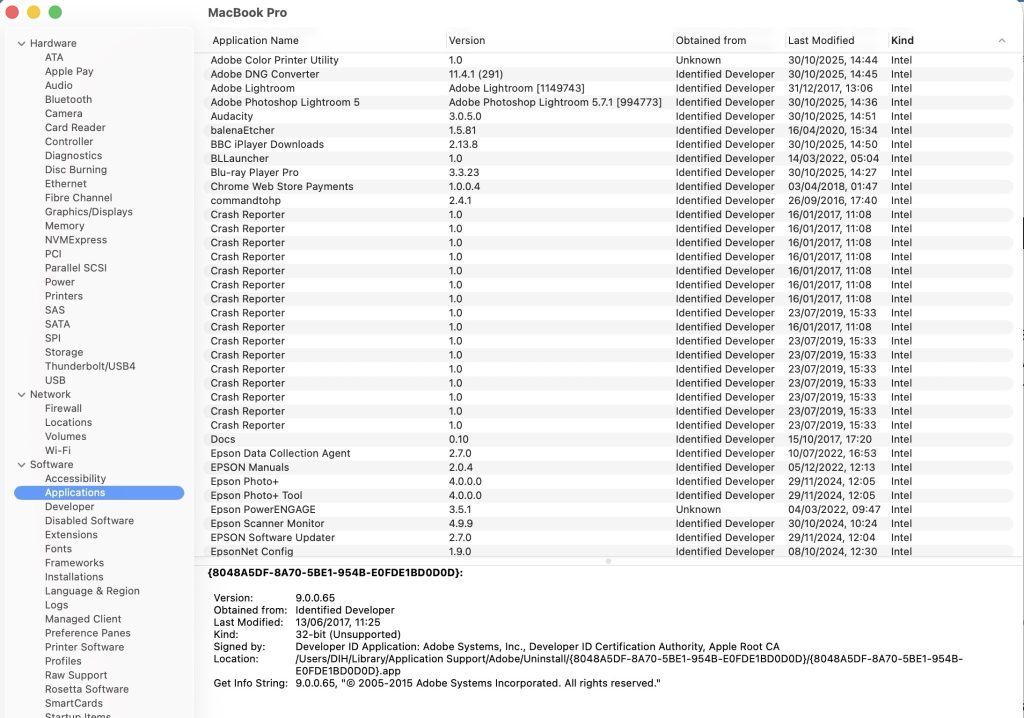
    System Report > Software > Applications screen

    Click on the box “Kind” to sort the Applications by Kind, and you will be able to scroll down to find the Intel applications you have to consider.

    All the best. Good luck.

    PS. Usual advice, don’t in any case upgrade your OS until it’s got at least past the 27.1 version; they’re already working on beta-versions of 27.2.
  • AI for me (Perplexity)

    AI for me (Perplexity)

    Creating and Managing Preferences in Perplexity

    AI assistants become more useful when they understand how you prefer to work. Whether you use Perplexity for research, writing, technical support, product comparisons or everyday questions, a few well-chosen preferences can make responses more relevant, consistent and easier to use.

    Perplexity works slightly differently from services that use a standalone preferences file. Rather than uploading a permanent document, you normally add your preferences through its AI Profile, Personalisation or custom-instructions settings.

    The AI Profile: Your Default Preferences

    Think of the AI Profile as a set of standing instructions. It tells Perplexity how you generally want it to respond and what background information is useful to keep in mind.

    Your profile might include:

    • Your preferred writing style and level of detail
    • Whether you prefer headings, lists, tables or brief answers
    • Your language and location
    • Your interests or areas of expertise
    • Devices, software or platforms you commonly use
    • Special instructions, such as using UK spelling or avoiding jargon

    A useful profile does not need to be long. A concise set of clear instructions is often more effective than a detailed personal biography.

    Write in clear, natural English. Start with a direct answer and keep responses concise but complete.
    
    Use headings, bullets and numbered steps when they improve readability. Use tables for comparisons.
    
    For recommendations, explain the main trade-offs. For information that may have changed, verify it with current sources.
    
    Avoid unnecessary jargon, hype and generic AI phrasing.

    This gives Perplexity a reliable baseline without making every answer sound rigid or over-formatted.

    Treat It as a Living Document

    Your profile does not have to be final. It is worth reviewing it occasionally as your needs, interests and working habits change.

    You might add an instruction after noticing a recurring irritation, for example:

    • Use UK spelling
    • Do not assume I use Windows
    • Put commands and code in code blocks
    • Explain the safest option first
    • When editing my writing, preserve my intended meaning

    It is equally sensible to remove instructions that do not make a noticeable difference. A short profile that you maintain is usually more valuable than a long one full of outdated details.

    Different Modes for Different Tasks

    Many people use an AI assistant for several unrelated jobs. The style that works well for technical troubleshooting may not be ideal for drafting an email, planning a trip or editing a blog post.

    A practical approach is to keep a few profile blocks in a note-taking app, then paste in the one that best suits the task. Three useful examples are technical, casual, and writing or editing modes.

    Technical Mode

    Technical mode is useful for software problems, hardware decisions, research, troubleshooting and step-by-step tasks.

    Be direct, accurate and practical. Diagnose the likely cause before suggesting a fix.
    
    Give the safest and least disruptive option first. Where relevant, include the likely cause, how to verify it, step-by-step actions and a fallback option.
    
    State assumptions clearly. Highlight compatibility issues, risks and trade-offs. Use headings, bullets, numbered steps and code blocks where useful.

    This mode encourages answers that are structured, practical and easier to apply independently.

    Casual Mode

    Casual mode suits everyday questions, light recommendations, hobbies, travel ideas and quick explanations.

    Write in a clear, friendly and practical tone. Start with the answer and keep the response easy to scan.
    
    Avoid unnecessary jargon and over-structuring. For recommendations, suggest the best option first, then offer a few alternatives with brief trade-offs.

    This keeps answers useful without turning a simple question into a detailed report.

    Writing and Editing Mode

    Writing mode is useful for website copy, emails, blog posts, captions, documentation and rewriting.

    Write in clear, natural language that sounds human and specific.
    
    Avoid hype, clichés, corporate filler and generic AI phrasing. Preserve my intended meaning unless I ask for a rewrite.
    
    For editing, provide usable copy directly. If helpful, offer both a light edit and a stronger rewrite. Prefer clarity over cleverness.

    This can be particularly helpful when you want to avoid the overly polished, repetitive or generic language often associated with AI-generated text.

    Use Short Instructions in Individual Chats

    You do not always need to replace your main profile. A short instruction at the start of a new conversation is often enough to set the style for a one-off task.

    Examples include:

    • Answer this in technical mode
    • Keep this brief and conversational
    • Rewrite this in natural UK English
    • Give me a practical answer with no jargon
    • Compare these in a table and recommend one

    This is often the quickest way to change tone or format while keeping your normal profile in place.

    Profiles, Memory and Chat History

    It is useful to distinguish between three related but different things.

    Profile instructions (sometimes described as Personalisation) are the preferences you enter deliberately in settings. They tell Perplexity how you generally want it to respond.

    Memory is information that may be retained from conversations to personalise future answers. This may include interests, recurring projects, preferences or details you have shared.

    Chat history is the record of previous searches and conversations in your account.

    An AI assistant may appear to know more about you over time because it is using remembered information or past conversations. That is not necessarily the same as changing the visible text in your profile.

    Does Perplexity Alter Your Profile Automatically?

    Your visible profile and custom instructions should remain something you control. There is no reason to assume that the text you have entered in settings is silently rewritten without your involvement.

    However, Perplexity may use remembered information and previous activity to personalise responses. This means its understanding of your interests or preferences may extend beyond the wording in your profile.

    If you value close control, review the relevant settings periodically. Look for options to:

    • View or clear remembered information
    • Manage chat history
    • Adjust personalisation features
    • Review data-retention or model-improvement settings
    • Update or remove profile instructions

    It is also sensible to avoid adding highly sensitive personal, financial or business information unless you are comfortable with it being retained under the service’s policies.

    A Simple, Sustainable Setup

    For most people, an effective arrangement is straightforward:

    1. Create one short, general profile with your core preferences.
    2. Keep two or three specialised versions in a notes app or plain text file.
    3. Use brief per-chat instructions for occasional changes of tone or format.
    4. Review your profile and memory settings every few months.
    5. Remove details that are no longer useful or that you would rather not retain.

    The aim is not to make the assistant know everything about you. It is to provide enough context to save time, reduce repetition and produce answers in a form that suits the task at hand.

  • Protected: AI – the future is in your hands … or is it?

    This content is password-protected. To view it, please enter the password below.

  • Protected: Meeting 9th October 2025

    This content is password-protected. To view it, please enter the password below.

  • An interesting perspective on the CrowdStrike incident …

    As hardware/software has developed, has enough consideration been paid to redundancy (ie failsafe solutions). This article, whilst bemoaning the underlying architecture of Microsoft’s Windows operating systems (since Windows 3.1), points more widely to the way that modern systems don’t really address the issue of … “What if this happens, then what?”

  • Google Photos & Snapseed – an update

    I’ve posted articles on using Google Photos a few times. Of course with the passage of time, features, and interfaces, change, so it is always useful to just review “what’s occurring”, and see whether there’s anything that needs correcting, or adding to. I will try and go back and edit the posts listed below to reflect changes that I’m aware of.

    First and foremost it’s important to note that I don’t tend to use Google Photos for anything other than sharing photos with family and friends, so my use of the editing features is a bit limited. I am however a strong advocate of using Snapseed (available from both the Google Play, and Apple App Store) as a photo editor, but as it works best with the Google Photos app, it’s necessary to install Google Photos as well. [Snapseed is not available as a native desktop app on Windows or MacOS; it’s only available on mobile devices (Android and iOS/iPadOS).] So the first link that’s important to be aware of is this one …

    Google Photos and Apple revisited – if you’re an Android user you can skip this article and move to the next paragraph – all your photos taken with your camera will be safely housed in the Google Photos app!!! If you’re an Apple user it’s important to understand how synchronisation works with Google Photos and the Photos app on iOS. If you’re not careful you can either end up with duplicate photos on both platforms, or worse still deleting photos from a device thinking that there’s a copy “in the cloud”.

    The next bit of housekeeping is to understand what happens if you want to delete a photo from Google Photos – it’s not entirely straightforward (but it is easier than in the Apple world!!!). This article I wrote – “How do you delete photos from Google Photos?” – attempts to help you delete what you want to delete from your device, or from Google Photos on the web. This is particularly a problem if you’re an Apple user with a Camera Roll, rather than an Android user with Google Photos – so you’d be advised to read it.

    So we finally get to editing our photos and using Snapseed. This article – “Snapseed and Google Photos” – is a good overview and will take you quite a way down the road of installing Snapseed, it covers the basics of how to get photos from a camera (rather than a smart phone) into Google Photos, and some basic editing of a photo. There are also links in the article to earlier posts on using Google Photos as well as a video on “getting started” and some additional references that I found useful.

    The new stuff!

    How To Use Google Photos: The Ultimate Beginner’s Guide [2023] – if you want to just stick with what’s possible for you to do in Google Photos this is just about as good a guide as you’ll get. It goes through all the features of the app, but doesn’t cover editing photos in any detail. If you want a video that covers the same ground, you might like to watch this [I’d like to remind you of the point I made about his reference to Backup and Sync if you’re an Apple user – my earlier comments apply!!! He has decided to use both iCloud and Google Photos on the web for two backups.]. Google’s help guide to editing photos is provided here.

    So we turn to Snapseed – here’s a beginner’s video on how to use Snapseed for editing, you should also refer to the article quoted in the earlier post – Complete Guide To Using Snapseed To Edit Your iPhone Photos – from which I also recorded the video from my computer screen, but it’s obviously better using the link from the article. Also please note that although iPhone is mentioned in the title, it’s 100% applicable to Android phones as well. Finally you might probably want to look at this – SNAPSEED: ULTIMATE USER GUIDE + TIPS (2024 UPDATE) – if I’ve convinced you that Snapseed is the “goto” app for photo editing on your smart device.

    Google is always updating its apps, and this is particularly true now that we have AI. So a recent update introduces the possibility of background blur – which can make a portrait of a person stand out more, by weakening the effect of the background. Google writes about its new AI features here, and here,

    Finally … this article has been all about using Google Photos, which might have let you think that Apple’s Photos app is not so good. In a forthcoming post, I will be examining how Apple Intelligence (available in the autumn) will quite possibly revolutionise Apple’s photo applications, and will for some, if not all, Apple users mean they might be less likely to use Google Photos going forwards. They’ve already moved to allow the sharing of albums stored in iCloud to anyone via a link. That’s progress!!!